

How to Make a Duct Tape Wallet
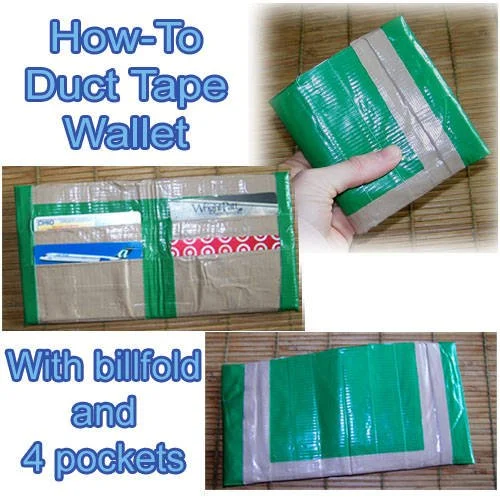
This original design requires no tape measure and has little bulk.
A duct tape wallet is a cheap way to create some funky style. This original construction for a duct tape wallet requires no measuring. It is also designed to fold easily in the middle, because most duct tape wallets I've found are very bulky and don't fold well.
What You'll Need
2 rolls of duct tape. You don't need much duct tape, but you may want 2 different colors.
Scissors
A piece of paper
This will take just ten steps and you can do this! Let’s get started.
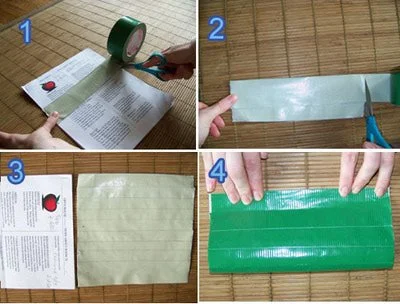
Create the Billfold Pieces
Make two separate rectangles for the billfold.
Measure a piece of your main color of duct tape across the width of the paper. This will be the width of your duct tape wallet.
Measure out another piece. Stick it on top of the first strip of tape, placing the top of the second strip at the middle of the first so that it is positioned halfway down.
Continue building your sheet until it is a square, as tall as the width of your paper.
Fold the square in half. I suggest pressing the edge together first, then smoothing back toward the fold. Once you press those sticky sides together, you won't be able to pull them apart, so take your time here.
Repeat this step to make the other side of the billfold. Set these pieces aside for now. Next, we'll make the credit card pockets.
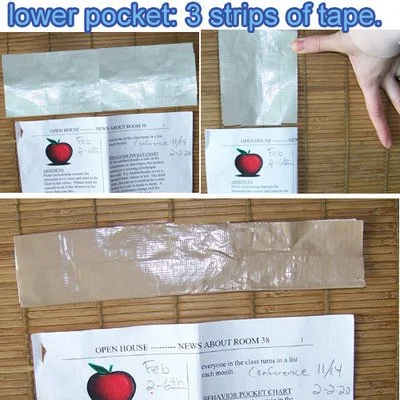
Make the First Card Pocket
This will be the bottom pocket of the wallet.
Measure a piece of tape across the top of your paper. This time, use your accent color.
Add another strip, just like we did in the previous step. Remember to lay the strips about halfway down on top of each other. Add enough strips so that your sheet is almost half the width of your paper, as shown. I needed 3 strips of tape to reach this point.
Fold the sheet in half.
Next, we will make the second card pocket.
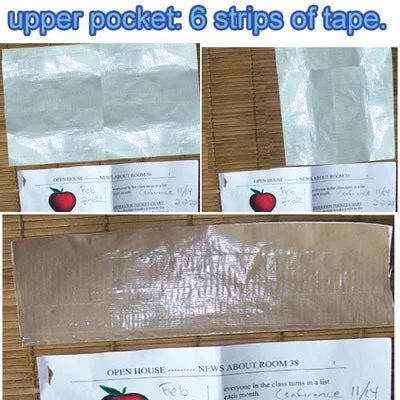
Make the Second Card Pocket
Make the second pocket larger than the first.
Once again, measure a piece of accent tape across the top of your paper.
This time, we'll add enough strips of tape to measure just over the halfway point of your paper. It took me 6 strips of tape to get to this point.
Fold the sheet in half.
Next, we will tape the billfold pieces together.
Tape the Billfold Pieces Together
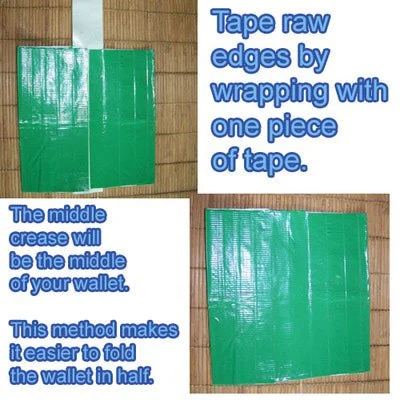
The crease in the middle will reduce pocket bulk.
We are taping the billfold pieces together instead of making them one big square in the beginning, because the crease will ensure the wallet folds easily in half.
Lay down a piece of tape that is twice the width of your paper. Lay raw edges of the billfold pieces so that they are butted up against each other on the middle of the tape. Wrap the tape around the pieces to create a square sheet.
Now we can start to attach the pockets.
Attach the Upper Pocket
Fold up the bottom of the pocket to support your cards.
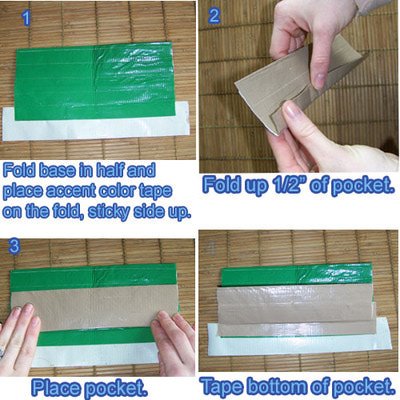
Make sure that the newly taped crease in the billfold is vertical. Fold the square up to make a rectangle. Lay down a strip of accent color tape, sticky side up. Place the fold of the wallet halfway down the strip, as shown.
Take the larger pocket we made and fold up the bottom about 1/2".
Lay the pocket about 1/2" up from the bottom of the billfold.
Tape in place with the accent color, flush with the bottom of the billfold.
Now we'll put on the lower pocket.
Add the Lower Pocket
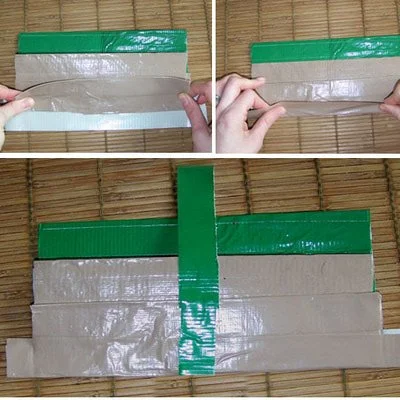
The green piece in the middle will hold to hold the credit cards in place.
Position the lower pocket so that it is level with the bottom of the billfold.
Fold up that piece of tape we left there in the last step.
Pull off a strip of main color tape that is slightly taller than the wallet. Rip the tape in half so you have a skinny piece. Lay this piece level with the bottom of the wallet, straight through the middle. Trim the extra at the top.
Almost done, now we will tape up the sides.
Tape Up the Sides
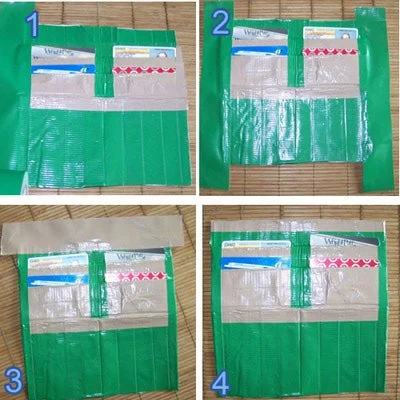
You need smooth sides or your wallet will leave sticky stuff in your pocket.
Unfold the wallet so it is a square again. Insert a credit card into each pocket to help you with this step.
Position a strip of main color tape along the left and right sides of the wallet. Place these strips so that they run right next to your credit cards. Fold these over. Trim the excess at the top and bottom.
Place an accent color strip along the top of the wallet, and a main color strip along the bottom of the wallet. Fold over.
Now you should have smooth edges all around your square. Next, we will create the billfold.
Tape Up the Billfold
Tape up to form the billfold.
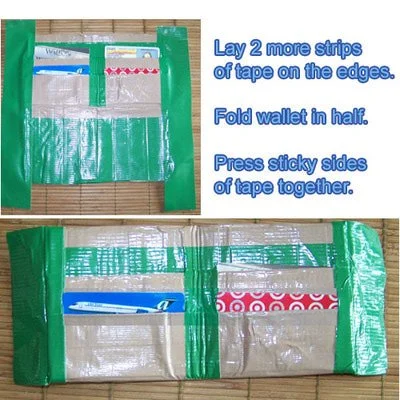
Lay two more strips of tape at the left and right edges just like we did in the last step.
This time, fold the square up in half, bringing the sticky sides of the tape together.
Time to finish up the wallet.
Finish Your Duct Tape Wallet
Tape down the side flaps to create a smooth look.
e need to tape down those side flaps. Fold the flaps toward the back of the wallet. We are taping down these flaps instead of cutting them off because it will strengthen the sides of the wallet.
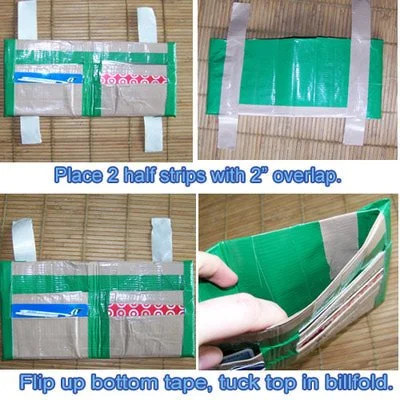
Tear a strip of tape the width of your piece of paper. Rip it in half lengthwise so you have two skinny pieces. Use these to tape down the flaps to the back of the wallet. Position the tape so that you have about a 2" overlap on the top and bottom.
Flip up the bottoms of the tape to stick them to the bottom pocket. Tuck the tops of the tape into the billfold. Your wallet is finished!
If you liked following this tutorial on my oh-so ad-free site, you might want to check out my other tutorials here on the site.
Customize Your Wallet
Break out the permanent markers and go to town.
Add stickers to the inside of your wallet.
This tutorial was originally published by Rain on diyfashion.about.com, then owned by The New York Times.


